
Removing stain from a piece of furniture can be a tedious and time consuming process. You might be wondering if you can stain over stain.
The answer is yes, you can stain over stain, but the color will not match the color displayed on the can.
Typically when you stain over stain, the new color should be darker than the current color. The current stain color will not lighten, it will either darken up or pull different undertones.
All types of wood will stain differently because of the undertones and grain that show through the color.
So, no matter what color you are using, it will have its unique look depending on the type of wood.
This is especially true, if you are applying stain over stain. If the piece of wood that you are staining over has red undertones, the red will most likely show through the new color.
Even if the new stain that you are applying does not have red in it.
So, if you dislike the red undertones, you might be better off removing as much of the color as possible or staining it with a very dark color.
The darker color can cover most of the red undertones, so test it in a small area to see if you are satisfied with the appearance.
Stain over Stain with Orange and Red Undertones
If the new color is still pulling red or orange undertones after testing a small spot, it might be best to sand or strip the stain.
I recently refinished my wood kitchen table because the current color was a dark orange and I wanted a lighter finish. Removing the stain took a lot of effort, but it was worth it to remove as much of the orange as possible.
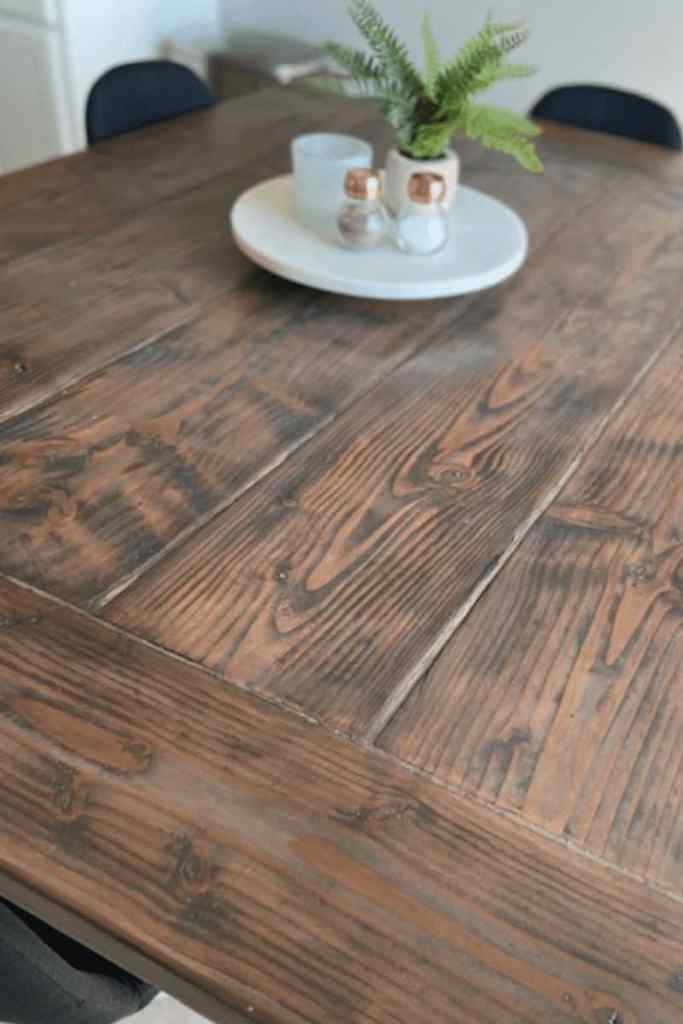
The stain on my kitchen table was not easy to get off, so I had to sand and use Citristrip to remove most of the orange color.
Since I could not remove all of the orange, I used a 2 part stain to tone down the orange undertones.
The first color that I used was a light gray color because the gray helped cool down the orange.
Then I applied a slightly darker brown stain to provide more coverage and even out the color.
The table didn’t come out as light as I hoped, but I am really happy with the outcome because the orange tones are not as visible.
How to Stain Over Stain?
Before you stain over stain, determine the color you are going for and the condition of the piece of furniture you are working with.
If you are working with a piece of furniture with red or orange undertones, you might need to apply 2 different stains to tone down these colors.
I like to use a gray wood color to help tone down these colors followed by a darker brown color.
Applying a thin coat of the darker stain helps better blend the 2 colors and cover more of the unwanted tones.
It will be easier to achieve the color that you are going for, if the current stain does not have red or orange undertones.
You can get away with 1-2 coats of a darker stain, and come closer to matching the stain color on the side of the can.
If you are planning on going lighter than staining over the existing stain will not be your best option.
Unfortunately, you will have to follow the steps below which are a bit more tedious than applying stain over stain.
When you Can’t Stain Over Stain – Lightening Wood
If you are looking to lighten wood then vinegar and bleach will not be your best option.
Bleach will not lighten a dark stain, believe me I tried. All you will be left with is a squeaky clean table that is still a dark color.
Bleach can be used on bare wood or a lighter stain, but rarely ever on a darker color.
If you are starting with a darker color, your best option is to use something like Citristrip or oven cleaner to remove the stain.
Easy Off Oven Cleaner is an easier and less messy option over Citristrip, so try oven cleaner first to see if it removes enough of the stain.
If you need tips to working with oven cleaner, take a look @woodandhomeaccents on Instagram. She is the queen of lighten wood with over cleaner. She has refinished so many pieces of furniture throughout her home with this trick!
You might have to use Citristrip a couple of times to complete remove the stain followed by sanding the wood to even out the surface.

Clear Coat for Wood
There are wood stains that come with a polyurethane mixed into the color. I have used these types of stains on a few projects, but I am not a fan.
The reason I avoid using a stain with polyurethane mixed in is because the color turns out differently compared stain without poly.
I have used the same brand and color with and without poly, and the color pulls a different shade with each type of stain.
So, I always use a stain without poly mixed in and apply the clear coat after I am done staining. My go-to clear coat is a satin or matte water based polyurethane.
I like to apply thin coats of the water based poly using a high density foam roller. The clear coat might appear to have small bubbles when you roll it on, but that will go away and you will be left with a smooth protective finish.
Can you Paint over Stain?
Painting over stain is much better to work with compared to applying stain over stain. The paint provides better coverage, so you can better hide unwanted orange or red undertones.
If you want the paint to look similar to a stain you could apply a wash instead of straight paint. A wash is any paint color mixed with water then immediately wiped from the surface.
There are several types of furniture paints out there and different methods, but my go to for painting furniture is an enamel.
My favorite enamel to use on furniture and cabinets is made with primer and clear coat built in, making this a very durable option.
To paint over any stain, I always recommend a light sanding with fine sandpaper to etch the surface. Wipe the area clean then begin painting the item.
If you are looking for additional tips to painting furniture or cabinets then follow these steps.
Can you Paint over Painted Furniture?
Yes, you can paint over painted furniture or cabinets and end up with great results. To paint over any item, I always recommend a light sanding.
Always make sure to wear a mask and work in a ventilated area when removing any type of paint or stain. There is a risk that you can stir up lead, so make sure to properly prep and clean your work area.

The sanding does not have to be down to the wood, just enough to roughen up the surface for the new coat of paint.
Sanding sounds tedious, but it will only take 15 minutes or less depending on the size of the item you are painting.
Even if a paint says you can skip the sanding step, never skip this step! Always do a light sanding, so you paint adheres really well and lasts for a long time.