
You might be wondering what the best cabinet paint is for your project. There are several options available to paint cabinets, so it can be a bit overwhelming!
The Best Paint for Cabinets – Enamel
My go-to paint for cabinets and furniture is enamel because it’s durable, easy to work with, and more affordable compared to a kitchen cabinet paint kit.

After trying several products on kitchen cabinets, bathroom vanities, and furniture, I keep coming back to one favorite: Behr Interior Semi-Gloss Enamel.
It’s durable, affordable, beginner-friendly, and performs just as well—if not better—than most cabinet paint kits.
Why Enamel is the Best Paint for Cabinets
Enamel paint is ideal for cabinets because it dries to a hard, durable finish that can withstand moisture, heat, and daily use.
Unlike chalk paint or latex, enamel resists chipping and scuffing, making it a long-lasting choice for high-traffic areas like kitchens and bathrooms.
Why I Recommend Behr Interior Semi-Gloss Enamel:
- Durable Finish – Holds up well in kitchens and bathrooms.
- Paint + Primer in One – No need for a separate primer.
- Tintable to Any Color – Choose any shade you want.
- Low Odor – Great for indoor projects.
- Budget-Friendly – A gallon typically costs less than a cabinet kit quart.
I’ve used it on multiple cabinet and furniture projects, and every time, it delivers professional-looking results with minimal effort.
Enamel vs. Cabinet Paint Kits
Cabinet kits can be convenient, but they’re not your only option—and often, they’re not the most cost-effective either.
| Cabinet Kit | Behr Enamel |
|---|---|
| Usually $70–$100 | About $40 per gallon |
| Limited color options | Tintable to any color |
| Separate steps | Paint + primer in one |
| Often includes tools | Buy only what you need |
You’ll get more coverage, more flexibility, and just as beautiful a finish with enamel paint—especially when paired with the right tools.

How to Prep Cabinets for Painting
The prep work is the most time-consuming part of painting cabinets, but it’s crucial for getting a smooth, long-lasting finish.
Step-by-Step Prep:
- Clean All Surfaces: Use a damp, soapy sponge to wipe down cabinets, drawers, and boxes.
- Degrease: For kitchen cabinets with cooking residue, spray Krud Kutter to remove grease and lightly etch the surface.
- Dry Thoroughly: Use a clean rag to remove moisture and any leftover residue.
- (Optional) Sand: Lightly sand glossy cabinets with fine-grit sandpaper to dull the finish. You don’t need to sand down to bare wood—just enough to help the paint grip.
- Tip: If you skip sanding, Krud Kutter helps roughen the surface slightly.
- Protect Your Surfaces: Lay drop cloths over countertops and floors to catch splatters.

Tools You’ll Need
Here’s what I used (and highly recommend) for a smooth finish:
- Behr Interior Semi-Gloss Enamel (or Satin for less shine)
- High-Density Foam Roller – For a smooth, texture-free finish
- Angled Paint Brush – To reach corners and trim
- Krud Kutter – Degreases and dulls the surface
- Paint Tray + Liners
- Painter’s Pyramids – Holds cabinet doors up while drying
- Gloves + Rags
- Drop Cloths or Plastic Sheeting
Don’t Skip This Step: Remove Doors and Hardware
It might seem tempting to paint your cabinets in place, but trust me—it’s not worth it. I once painted cabinets without removing the doors and ended up with messy edges, drips, and painted-over hardware.
Here’s what to do:
- Remove all doors, drawers, and hardware.
- Label each piece: Use post-it notes or painter’s tape with matching numbers or letters so everything goes back exactly where it belongs.
- Store hardware in labeled bags for easy reassembly.

How to Paint Cabinets with Enamel
Once everything’s prepped and removed, it’s time to paint! Behr enamel goes on smoothly and usually covers well in two coats.
Painting Tips:
- Start with the brush. Use an angled brush to cut in around corners, grooves, and detailed areas.
- Roll it on. Use a high-density foam roller for flat surfaces to avoid brush marks and create a smooth, even finish.
- Thin, even coats. Don’t overload your brush or roller. Lighter coats dry better and reduce drips.
- Follow the grain. Always brush or roll in the direction of the wood grain.
- Dry time matters. Let the first coat dry fully—ideally several hours or overnight—before applying a second coat.
Dry Time & Curing Tips
Paint drying and curing times can vary depending on humidity and airflow.
- First Coat Dry Time: Several hours (longer if humid)
- Second Coat: Once the surface feels dry to the touch
- Fully Cured: 48–72 hours before reinstalling hardware or handling heavily
If it feels tacky, wait longer. Enamel needs proper time to harden and fully cure.
No Top Coat Needed!
One of the best parts of using Behr enamel is that you don’t need a separate clear coat. It dries to a hard, semi-gloss (or satin) finish that’s already sealed and protected.
Unless you’re doing a high-use commercial space, this enamel provides all the protection your cabinets will need.
Reinstall Doors & Admire Your Work
Once the paint has fully cured (after about 2–3 days), carefully reinstall the doors and hardware. Because you labeled everything during prep, this step is fast and frustration-free.
Take a step back and enjoy your beautiful, freshly painted cabinets!
Final Thoughts
Painting cabinets might feel intimidating at first, but once the prep work is out of the way, it’s actually a fun and satisfying project. Watching your space transform with just a few coats of paint is incredibly rewarding.
Behr Interior Enamel has become my go-to paint for cabinets and furniture because it’s:
- Easy to apply
- Affordable
- Durable
- Beginner-friendly
- Tintable to any color
If you’re looking for a cost-effective alternative to a cabinet kit with professional results, I can’t recommend this paint enough.
Want even more cabinet painting tips? Check out our full guide on what to avoid, how to avoid brush strokes, and how to tackle large kitchen projects.
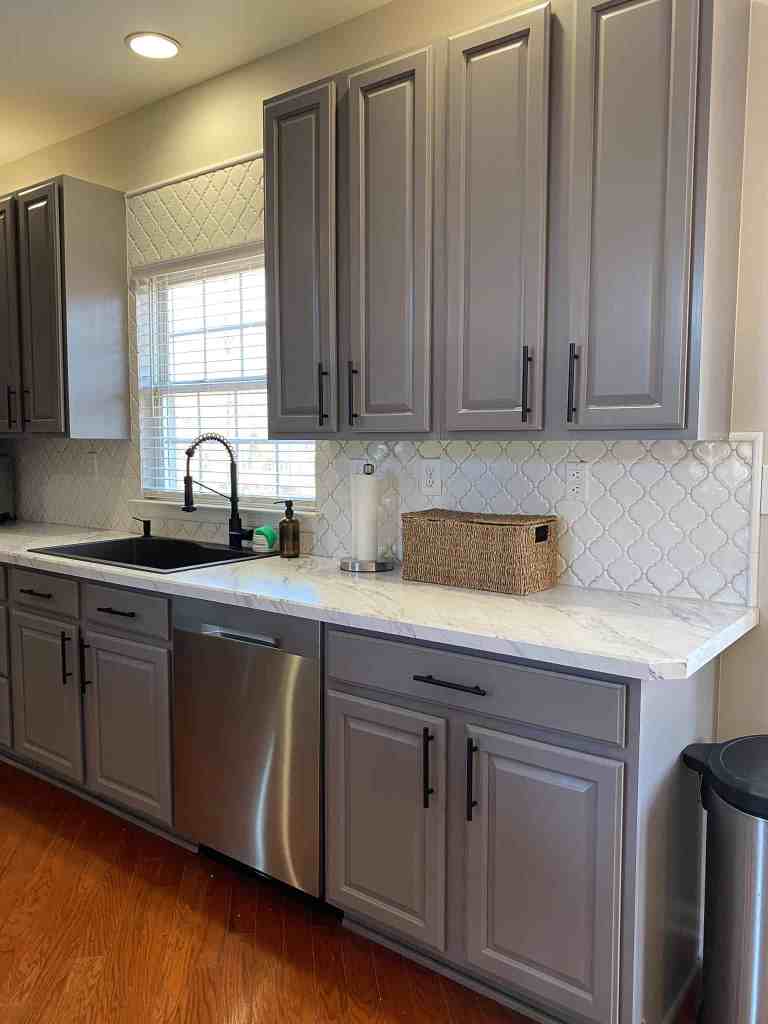
The color of the gray cabinets is Dusty Lead by Valspar. We brought the paint chip to Home Depot and they were able to mix this color into Behr cabinet paint.
What color did you use?