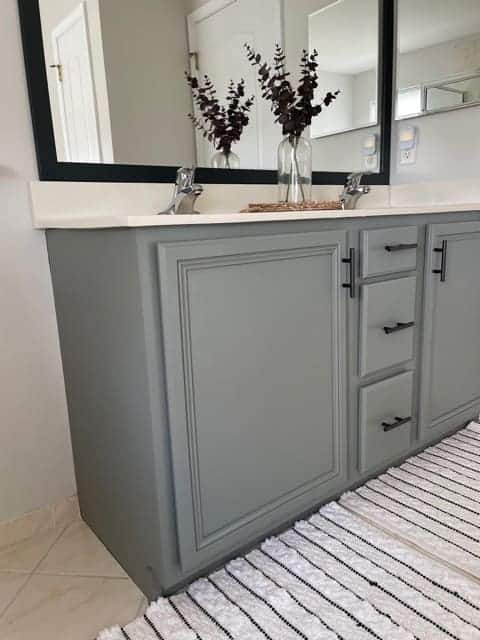
Skip to Content

Tips to Painting Bathroom Cabinets

Does your bathroom need a quick and affordable makeover? Painting bathroom cabinets can be completed in a weekend and costs less than $100!

These tips on how to paint bathroom cabinets will give you a smooth and lasting finish especially if you use this bathroom cabinet paint.

I am share my bathroom vanity paint and painting tips, so you can transform your bathroom on a budget.

Painting bathroom cabinets will dramatically change the look and feel without breaking the bank.

Painting Bathroom Cabinets

If you don’t want to spend a lot of time and money to renovate your bathroom, a painted vanity and mirror frame can make a big difference.

I have painted every room in my home including my kitchen cabinets, several pieces of furniture, and more.

So, I decided to try the same paint that I used for previous cabinet projects are bathroom cabinet paint.

Painting bathroom cabinets is easier than you think, if you have the right paint and tools. This project can be finished in a weekend and totally transform your space.

painting bathroom cabinets
After – Repainted to a Gray Green

Shopping Checklist:

before and after painting bathroom cabinets
Before and After

The Best Bathroom Cabinet Paint

My go-to for painting bathroom cabinets is Behr Interior Semi-Gloss Enamel.

This paint is perfect for painting bathroom cabinets because it can resist mildew and moisture.

The semi-gloss finish adds a light shine that is easily wipeable. This bathroom cabinet paint can be tinted any color, so you have endless color options for your bathroom cabinets!

Another great thing about this paint is if you don’t like how the color came out, you can lightly sand and paint it again.

how to paint bathroom cabinets

Here are the best shades of green for any project, if you are thinking about painting your vanity green too!

I have also used this paint on kitchen cabinets and furniture too! If you want to learn more about this Behr paint, you can read more here!

Guide on How to Paint Bathroom Cabinets

Painting bathroom cabinets is an easy project that can be completed by a beginner. This project will be finished in a weekend and dramatically update your bathroom for less than $100!

Remove Cabinet Hardware: First remove all hardware, cabinet bumpers, cabinets doors, and drawers from the bathroom cabinets.

Wipe Bathroom Cabinets: Then wipe down the vanity with a damp soapy sponge, followed by a clean rag to dry the surface.

Light Sanding: After the vanity has been properly cleaned, lightly sand all surfaces with fine sandpaper. The sanding does not have to be down to the wood, just enough to roughen or etch the surface.

Clean the Dust: Wipe down the vanity again to remove any dust from sanding.

Remove Cabinet Doors: Remove the doors, and drawers from the vanity.

Apply Bathroom Cabinet Paint: Apply the first coat of vanity paint with a roller and paint brush. Allow the paint to dry for several hours before applying additional coats of paint.

Optional Clear Coat: This bathroom cabinet paint is so durable that it doesn’t need a clear coat. The clean coat is optional here.

Replace Doors & Drawers: Hang the bathroom cabinet doors up and place and replace the drawers.

Replace Hardware: Replace hardware and cabinet bumpers.

It really is that easy to paint bathroom cabinets! This bathroom cabinet paint holds up great with very minor wear overtime.

We share a couple of tricks to repair chipped paint, if you should have notice a chip in the paint.

bathroom vanity paint
Before

Best rollers for painting a bathroom vanity?

High density foam rollers are the best rollers when painting a bathroom vanity. These rollers provide even coverage, leaving you with a super smooth surface.

Make sure you do not purchase a paint roller that has texture

Don’t forget to purchase a paint roller frame that will fit, if you do not already have one.

The Best Paintbrush for Painting Cabinets

This brush is a little more than I typically spend on a brush, but you can use this brush multiple times if you wrap the brush.

I typically brush on bathroom cabinet pain into all areas that the roller cannot cover then follow up with the roller.

Label Hardware

Remove and label vanity doors and drawers with a post it note, so you reinstall in the correct location when you are done painting.

Place any hardware in a plastic cup or bag, so you do not misplace these items.

Time to Paint the Vanity

After the vanity has been properly prepped, it is time to paint. Apply the paint to the front surface of the doors before flipping the doors.

The doors and drawers might feel dry to the touch, but they are not fully cured so be careful not to smudge the paint.

I recommend painter’s pyramids because they prop the doors up, so you can work on both sides of the door at the same time.

Allow the first coat to dry overnight before applying additional coats of paint. Depending on the paint color, you should use at least 2 coats to completely cover the vanity.

Top Protective Coat (Optional)

No Clear Coat is required – the paint and primer are all mixed in one to finish and seal the surface.

I painted my bathroom cabinets 2 years ago, and they still look great!

If you prefer the extra protection, I recommend using a water-based polyurethane.

Replace Hardware and Bumpers

After the vanity has completely dried, replace hardware and cabinet bumpers on the back of the doors and drawers.

diy bathroom vanity
Cabinet Bumpers

How to Fix Chipped Paint on a Bathroom Vanity

My painted vanity recently chipped because I slammed the scale against the vanity by accident.

To fix the chipped paint, watch the video in this post or read more about caring for painted cabinets.

how to paint a vanity
Before fixing the chip

Conclusion

I hope you found this tips on how to paint bathroom cabinets helpful for your project. If you really want to take it up another notch, you could replace the hardware, faucets, add decor, towels, and frame the bathroom mirror.

Painting the bathroom vanity is a quick and easy project that can be complete in a weekend for under $100.

It’s a great option if you do not have a large budget or are look for an affordable way to makeover your bathroom.

Are you looking for bathroom renovations ideas? You will love these other bathroom decor ideas!

AMAZON AFFILIATE Rocksolidrustic.com is a participant in the Amazon Services LLC Associates Program, an affiliate advertising program designed to provide a means for sites to earn advertising fees by advertising and linking to Amazon.com. This can include installing cookies. By using this website, you agree to  our terms of service.

This site uses Akismet to reduce spam. Learn how your comment data is processed.

Eliana

Friday 27th of November 2020

Wow, I'm having some work done at my house for the holidays and, to be honest with you I'm not happy with the paint job in my house. There is paint drip in some area and the rest of the house is pretty much the same.

Brian & Lacey

Friday 27th of November 2020

I’m so sorry to hear that about the projects in your home. I have had bad luck when I paid someone to work on our house before too. I started figuring out how to do things myself because I realized no one cares more about my home than me. To fix some of the paint drips, you could try lightly sanding the area and repainting. I hope some of our posts can help you! Please let us know if you have any questions. -Lacey

Maria

Wednesday 28th of August 2019

Great post!! ♥️

This site uses Akismet to reduce spam. Learn how your comment data is processed.