
If you have an ugly orange banister railing then you need to read these tips on how to stain a staircase. No need to remove anything or spend a ton of money to for a staircase makeover. A little paint and stain goes a long way!
DIY Staircase Makeover for Beginners
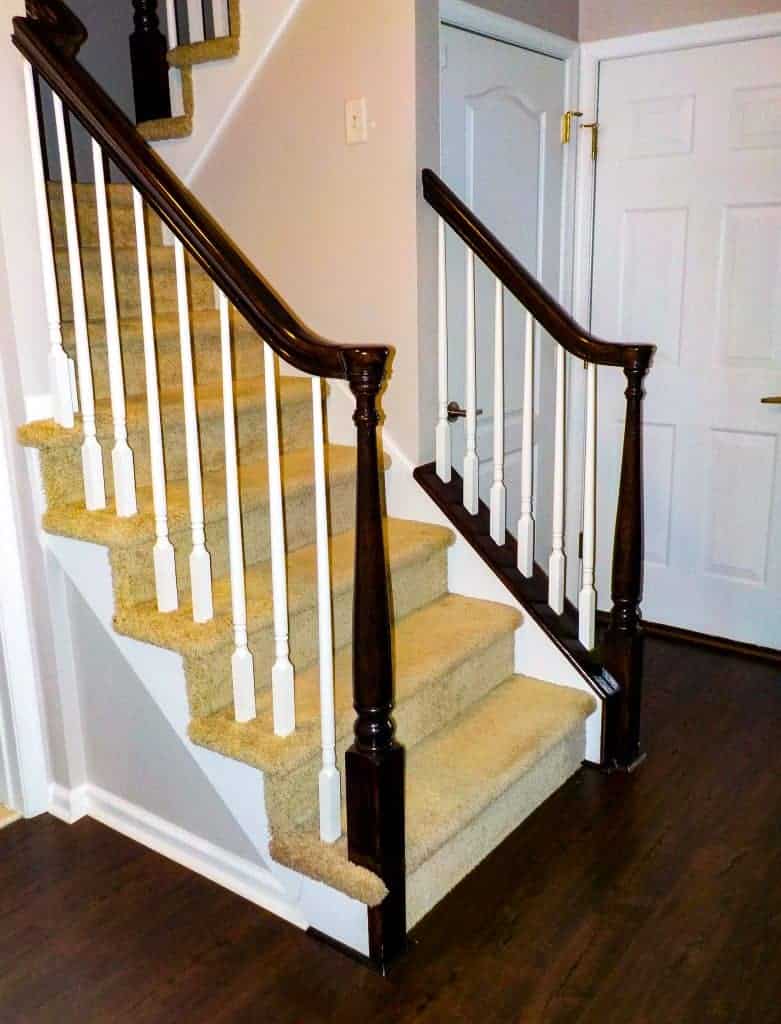
I couldn’t live with an orange banister railing, especially with recently installed floors that didn’t match. To save money, I decided to stain and paint my staircase instead of replacing everything.

Since I recently installed Pergo flooring in the color Java Scraped Oak, I went with the stain color in Kona by Varathane because it matched perfectly. This project is easy, so don’t feel intimidated to tackle this staircase makeover.
Items Required to Stain a Banister:
- 1 quart of Varathane Kona Semi-Gloss or Satin
- Wooster Brush for Stain and Varnishes
- Lots of rags and drop clothes
- Painters tape
- Mask
- Gloves
- Fine sandpaper
Items Required for Painting Spindles:
- White Semi-Gloss Paint
- Painter’s Tape
- Paint Brush
- Primer (Optional)
- Painter’s Mitt (Optional)
How to Prep a Staircase for Staining & Painting
Clean: Before staining a staircase, make sure to wipe down the banister with a damp sponge to remove any residue or dust from any areas that are going to be stained and painted.
Dry: After wiping all areas with a damp sponge, dry the staircase then place drop cloths under the areas that will be sanded.

Sand: Use light pressure and fine sandpaper to gently roughen the surface of the staircase. The sanding does not have to be down to the wood, just enough to etch the surface.
Remove Dust: Grab a dry cloth to remove all of the sanding dust before staining the railing. Followed by a good vacuuming to avoid stirring up dust when working on your staircase makeover.
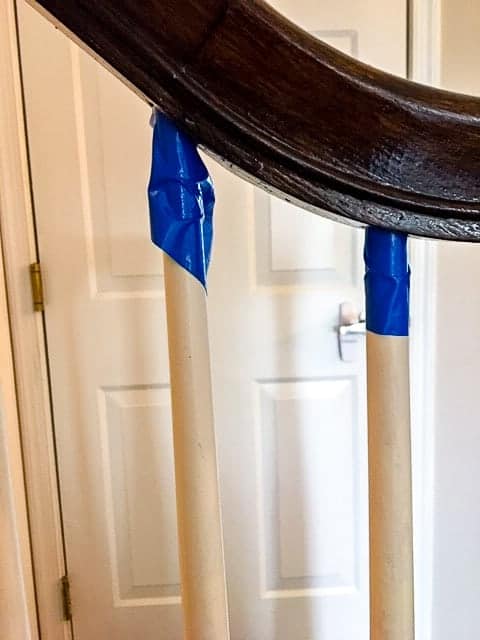
Tip: Wrap painters tape around the top and bottoms of the spindles to prevent stain from splattering on to the spindles.
Prep the Floor and Stairs: Protect your surrounding areas with a drop cloths to prevent stain splatters.
How to Stain a Staircase Railing
Get on your PPEs: Put on a N95 mask, gloves, and safety glasses to protect yourself. Open nearby windows if possible to ventilate the area.
Time to Stain: After putting on gloves, dip a dry cloth or brush into the stain then apply a thin even coat onto the stair railing. Make sure to stain with the grain of the stair railing and use a brush to get into smaller areas then smooth with the dry cloth as needed. The first couple of coats of stain looked very streaky, so don’t panic it will look better after another coat of stain.

Additional Coats of Stain: Allow the first coat to dry for several hours or overnight before applying additional coats of stain. After the first coast has dried completely you can begin applying the 2nd coat of stain. Continue to follow these steps until you have achieved the color you are going for.
Clear Coat: If you are using a stain with polyurethane mixed in then you can skip this step. If your stain does not have clear coat mixed into it already, then you should lightly brush on a thin layer of clear coat all over the stain to protect it.
How to Paint Staircase Spindles
To give staircase spindles an update, apply painters tape underneath the railings and along the floor to avoid paint drips. I prefer to use a brush there are other tools that can help speed up the project such as a painters glove and rounded rollers.
If your staircase spindles area already white then you can just give them a freshening up with a coat of white semi-gloss paint. One coat of paint should do the trick to update the spindles if they were originally white.
To update white spindles, grab a brush and use this one coat coverage semi-gloss to apply a thin coat of paint onto all areas of the spindles.
If your spindles are wood tone, you will need to lightly sand the spindles with fine sandpaper. Then wipe and clean the dust with a rag followed up by a vacuuming on the staircase. Next dip you brush or painters glove into the white semi-gloss paint and gently apply the paint to the spindles.
Make sure not to oversaturated the spindles to avoid paint drips. Allow the paint to dry for several hour or overnight before applying additional coats of paint.
If you spindles were originally wood tone, it might take an extra coat of paint to completely cover. You might be able to get away with a quick second coat of paint to touch up areas that the wood tone is showing through the paint. This paint is very durable, so there is no need for a clear coat.
It’s really that’s easy to get rid of a cheap looking banister. This staircase railing dramatically updated the whole look and feel of my home.
Before you start your project, take a look at these ideas for inspiration and stain colors ideas for your staircase makeover. If you are updating your basement stair case, you will love these basement bar ideas for your next project!
Conclusion
Even with crazy toddlers running around beating up everything in my home, my staircase makeover held up great! I stained this staircase over five years ago and it still looks like I just finished the project.