
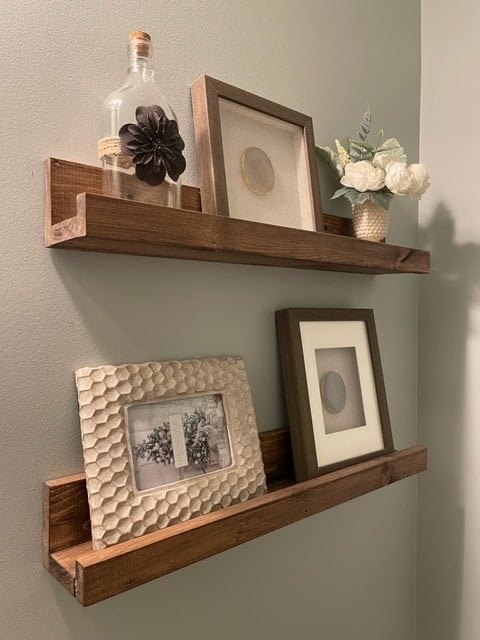
Shelving and brackets can get expensive, so instead you should consider making DIY bathroom shelves. These shelves can be built from scrap wood or for less than $20 in lumber.
The great thing about these shelves is that you can build them to fit any space in your home and stain or paint them to perfectly match your style.
DIY Bathroom Shelves
To build diy bathroom bookshelves you will use 1×4’s, 1×3’s, and 1×2’s. The 1×4 will be used as the back piece that is mounted to the wall.
Then the 1×3 will be the shelf that and the 1×2 will be the lip on the front of the shelf.
Cut List:
- 1×4 common board – 2 pieces cut to 2 feet each
- 1×3 common board – 2 pieces cut to 2 feet each
- 1×2 common board – 2 pieces cut to 2 feet each
Step 1: How to Build DIY Bathroom Shelves
Cut all wood down to 2 feet in length then adhere it with wood glue and finishing nails. I used a nail gun to assemble my bathroom shelving, but you could use finish nails and a hammer.
To assemble the first bathroom shelf, lay a 1×3 down then apply wood glue on the edge to adhere a 1×2 to the 1×3.
Step 2: Attach the Wood Shelves
Now that all of the wood is cut to size and placed on the floor, grab a nail gun or a hammer and finish nails.
Then with a nail gun or finishing nails and hammer, nail the 2 pieces of wood together. Start from the left then work your way to the right of the wood, using about 3-4 nails.
Then flip the shelf over to adhere the 1×4 to the back by applying wood glue to the edge of the 1×3.
Make sure the diy bathroom shelves feel flush before using nails to attach the 2 pieces of wood. Continue to follow these steps until all of the bathroom shelves have been completed.
Another easy and affordable way to dramatically update your bathroom, is to paint the bathroom vanity. Take a look at my bathroom vanity makeover project!
Step 3: Sand and Stain the DIY Bathroom Shelves
Give the shelves a light sanding with fine sand paper, if you shelves are in decent shape. If the wood isn’t in the best shape, then you should start with a more coarse sandpaper then work your way to fine to smooth out rougher areas.
Then wipe the shelves down to remove any debris then use an old t-shirt to stain the shelves. Next cut a small section from the t-shirt and fold it into a a square to start staining the shelves.
Dip a corner of the square into the stain color and wipe the stain with the wood grain of the wood.
After a few seconds, wipe the stain away and continue this process until the shelves have been completely stained.
Allow the shelves to completely dry before applying a thin coat of polyurethane. If you need more tips to stain wood, you will find this post helpful.
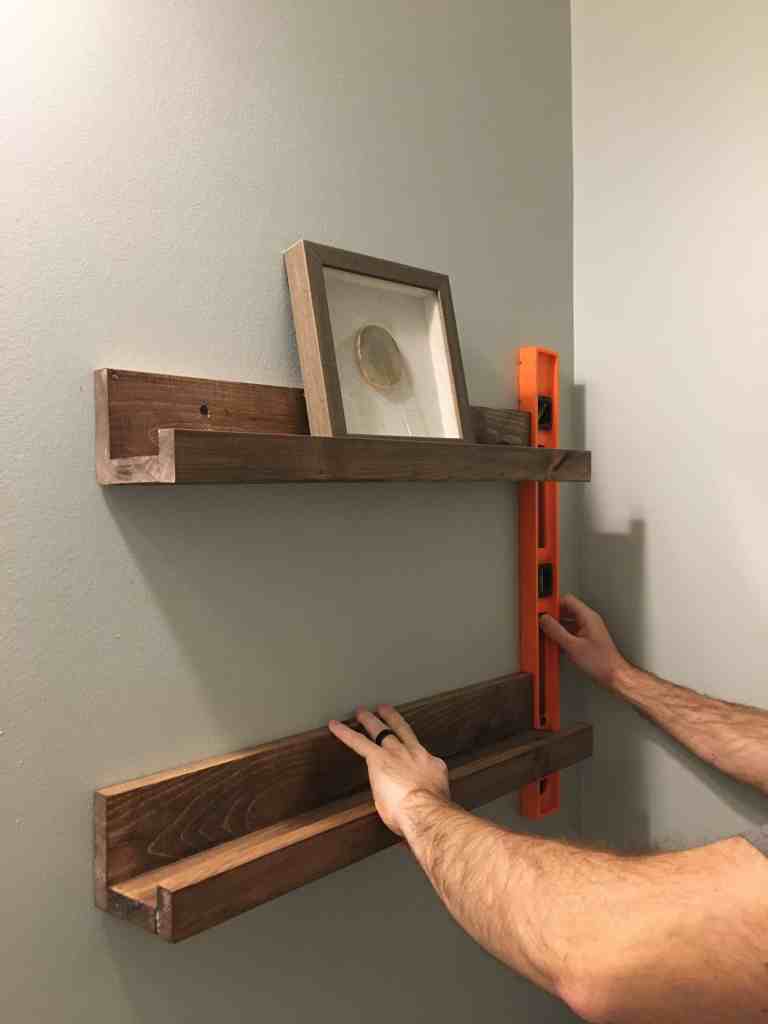
Step 4: Mounting Bathroom Shelving
To mount the bathroom shelves over the toilet, determine where the studs are on the wall.
It is best to mount any type of shelving to studs for maximum support and strength.
Even if you do not plan on putting a lot of weight on these bathroom shelves, you should still mount these to 2 studs.
Grab a stud finder and locate 2 studs then do your best to try to center the shelves, so you hit both studs.
Hold the DIY bathroom shelves up to where the studs should be then drill a pilot hole directly through the shelves and into the wall.
Gripping the shelf firmly with one hand, place the level on top of the shelves to make sure it is level.
If you need to adjust the shelf, hold the shelf firmly where the first pilot hole is then slide the shelf up or down so it is leel.
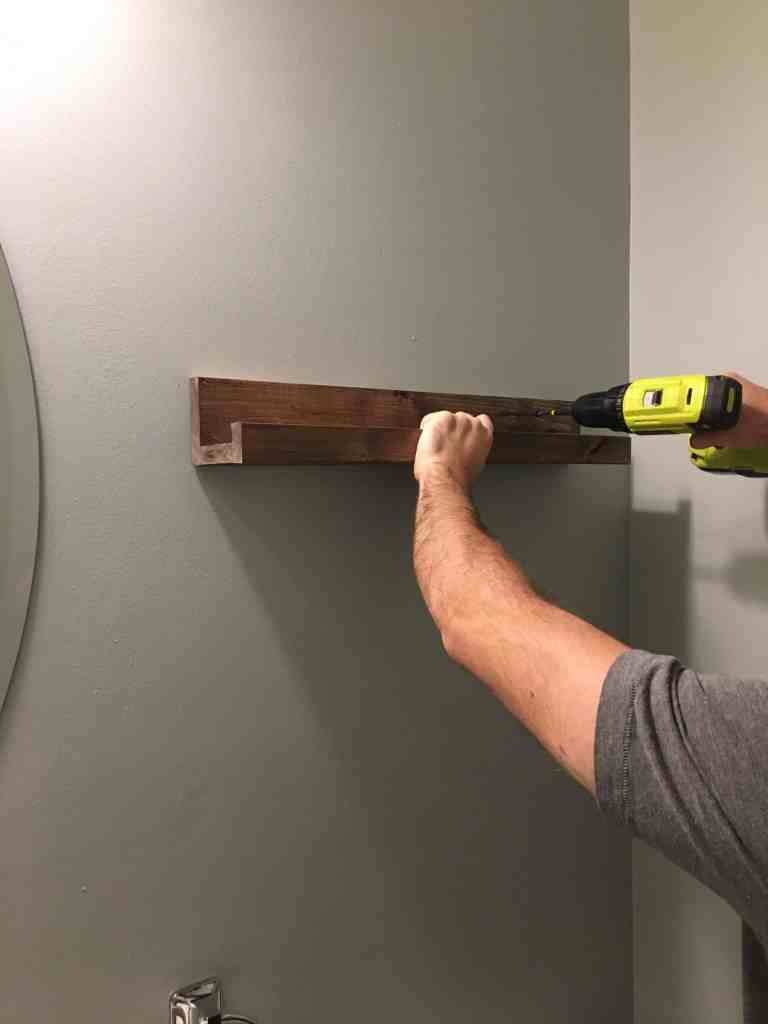
Then drill the second pilot hole through the shelves and into the stud. Double check that the shelves are still level before screws into the wall.
After you have drilled 2 pilot holes into the studs, use 2 ½ inch drywall screws to mount the shelves to the wall.
Once more check that the shelves are level before mounting the second shelf.

Hang the second bathroom shelf about 10 inches below the first shelf to leave plenty of room for decor.
Conclusion
Follow the same steps mention above to mount the second shelf to the studs. Now you have 2 bathroom shelves that you can decorate!
For additional shelving ideas, check out The Handyman’s Daughter. She has 25 unique shelving design ideas that are beginner friendly and affordable.