
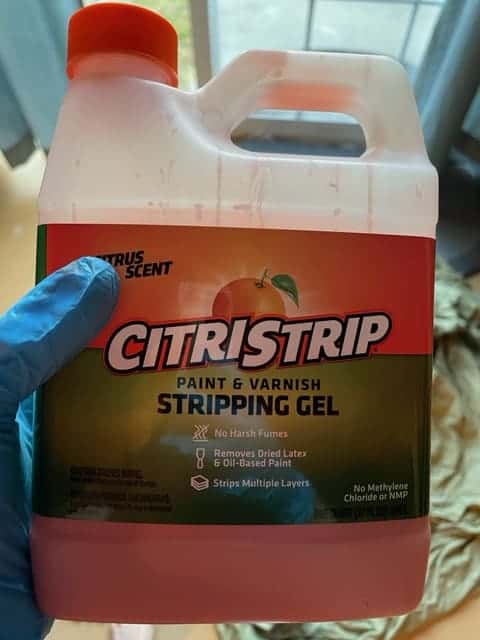
Looking to remove that dark stain from that piece of furniture? Removing dark stain can be done with Citristrip and a lot of patience because it’s a messy process.
How to Use Citristrip Gel
Stripping wood furniture is not my favorite project because it can be tedious and time consuming. It usually is worth all the effort to remove that stain, so keep in mind the end result throughout the process.

Ventilated Area: To get started using Citritrip, take your item outdoors to remove the stain. If that is not possible, make sure you are working in a ventilated area.
Wear PPE: Make sure to wear personal protective equipment to keep yourself safe during the
Protect the Area: Also make sure to place drop cloths underneath your working space to protect the surrounding area. Use painters tape to protect any areas on the wood that should not be stripped.
Grab a Brush or Rag: Now it is time brush on or wipe a thick coat of Citristrip onto your wood furniture.
Items Required to Remove Stain:
- Citristrip Gel
- Mask
- Gloves
- Putty Knife
- Paint Brush or Rag
- Drop Cloths
- Paint Stripper Wash
- Plastic Wrap
- Mineral Spirits (optional)
How to Strip Wood Stain
Apply a thick coat of Citristrip gel and leave it for at least 30 minutes or up 24 hours. Not much will happen in 30 minutes, so I recommend letting the Citristrip work longer. After applying the gel, cover it with plastic wrap to prevent it from drying.
Before removing the gel, test a smaller area to see if the stain starts to budge. If the stains looks like it will easily come off then you can start removing the gel.
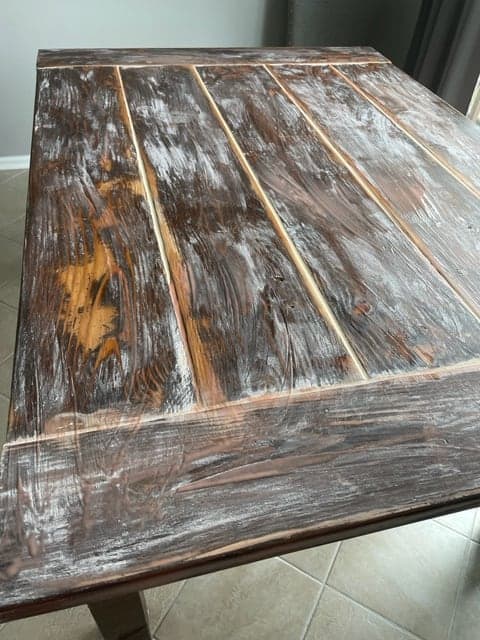
I let the Citristrip sit for about 3 hours before scrapping it off the table, but I recommend leaving the gel on longer if you can. The wood stain color only looked slightly lighter on my table because I should have left the gel on longer.
Related Posts
How to Remove Citristrip Gel
After scrapping the gel and stain from your piece of furniture, apply a paint stripper wash. A paint stripper wash removes the residue left behind from the stripping gel.
If the wash did not completely prep the surface for painting or stain, you can try mineral spirits. You may even need to sand off some of the gel to smooth the surface.

Applying a 2nd Coat of Citristrip
If you still have large sections of stain that won’t budge, you should try another thick layer of Citristrip and leave it on longer. The gel did not totally strip the stain from my table, but I didn’t feel motivated to remove the gunk from my table again.
Another coat of Citristrip stripping gel would have done the trick, but I decided to give the table a light sanding instead. Most projects require 2 coats of gel to completely the stain, so be patient because the prep work is worth it.
Sanding After Citristrip
Removing stain was more work than I excepted, so I stepped way from this project for a week. After taking a break from the project, I decided to use coarse sandpaper to remove the rest of the stain.
I made a plastic draped tent around my kitchen table to keep as much dust inside as possible. Sanding was the last option, but I knew it would work with a lot of effort.
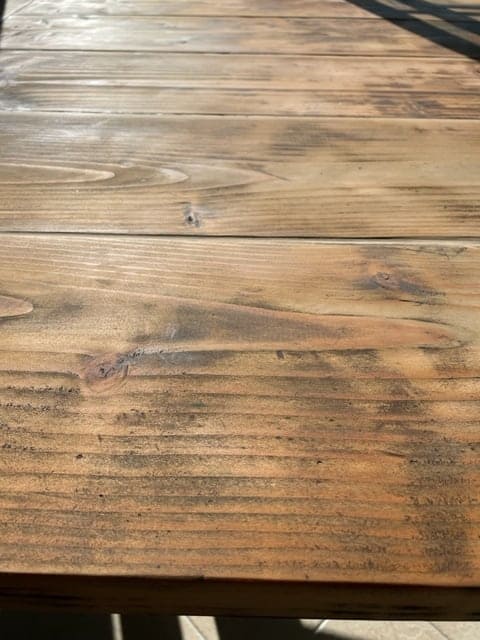
It took me about an hour to sand the entire top surface of my kitchen table, but it removed almost all of the stain.
Prepping and Staining the Wood
After sanding, don’t forget to prep the wood for the new stain. If you have a large piece of wood missing from your table, you can try this trick to fill the damaged wood.

Instead of using a light wood stain color, I decided to go with my favorite 2 part wood stain mentioned above. Here is the after of my kitchen table project. Don’t mind the mismatch chairs and bench as these were temporary.

The table might not be exactly what I wanted in the end, but I appreciated the effort that went into this project.
Conclusion -Worth the End Result!
I will be honest, I felt defeated with this kitchen table project because it took me so long to finish. My table turned out really nice in the end, so it was worth all the time and trouble.
Take your time with your project, so you don’t feel burned out like I did. DIY doesn’t always go as planned and isn’t as easy as the videos you see. Stick with it and enjoy the process of DIY instead of rushing to get the project done!