
Do you need a small bench for an entryway or for your kitchen table? You can easily make a custom DIY wooden bench from scrap wood in a couple of hours.
DIY Wooden Bench
This DIY wooden bench was built with scrap wood from other projects and easily supports 3 people, so it is rock solid! To build a bench all you need is a Kreg Jig, wood glue, wood, and screws.

I found a small mattress topper on sale that I used to add padding to my bench. The upholstery fabric is a thick piece of fabric purchased from Hobby Lobby. Even a curtain or a blanket could work for this bench as long as the material is thick and durable.
Wood Shopping List/Cut List:
- 1 – 2×12 @ 6 feet long (Cut to 46 inches)
- 1 – 2×10 @ 6 feet long (2 pieces cut to 18 inches)
- 1 – 2×4 @ 8 feet long (2 pieces cut to 34 inches)

Adding the Legs to the Bench
The top of the bench is a 2×12, and the bench legs are 2×10’s. The side skirt and supports for the diy wooden bench are made from 2×4’s.
I originally built this padded diy wooden bench to go with our rustic wood kitchen table. My kitchen area wasn’t very large, so instead of using chairs on the one side of my table, I made and upholstered a bench.
The 2×10’s determine the height of the bench, so if you want it shorter, just cut those pieces down to the size you need. You will need some of the “waste” from the 2x4s for additional support, which I’ll explain later.
I drilled 3 pocket holes in the end of each 2×10, spaced out evenly. To easiest way to build the bench is to lay the 2×12, flat side down, on the floor.
I positioned the 2x10s (standing up with the pocket hole side facing in) 4 inches from each end and centered on the width.

Before screwing them in, I made sure that the 2×4’s would contact each board. I laid out the pieces of wood to make sure they all fit together before permanently adhering anything.
I used wood glue and the pocket screws, that work with the Kreg Jig, to screw in the 2×10’s.
Adding the Support for the Bench
Then I added the 2×4’s as support on each side of the 2×10’s. Although you could also use the Kreg Jig and pocket screws here, I just used wood glue wherever it contacted the 2×10 legs and 2×12.
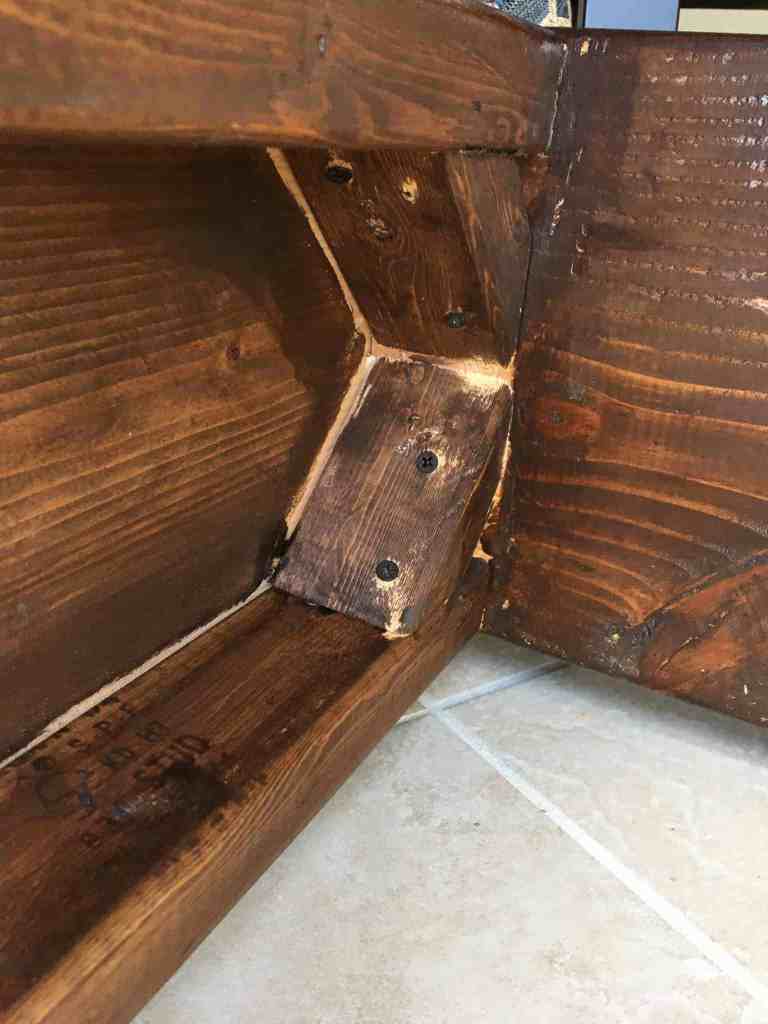
I used 5 wood screws, screwed in from the top, to attach these pieces. For additional support, I cut 4 small 2×4 pieces on a 45 degree angle on each end to add to the 2×10 legs, as seen in the picture. I used wood glue and screws to attach these.
How to Sand the Wood Bench
I started with a course sandpaper in 60 grit to smooth deeper scratches in the wood then transitioned to a higher grit sandpaper. After sanding with 60 grit, I used 150 grit sandpaper then 220 grit sandpaper to smooth these areas that were deeply sanded.
For all other areas that just needed a light sanding, I used a fine 220 grit sandpaper to smooth the surface, so the stain and paint would really stick.
Tips to Stain the Bench
The stain has a strong odor because the stain is oil based, so make sure windows at least a few windows are open while staining and you wear an N95 mask and gloves.
Next take a rag and wipe down the table to make sure all the sanding table has been removed. Now that the bench has been wiped clean, you can begin staining. Grab an old t-shirt or a brush then apply a thin coat of stain in the same direction of the grain of the wood.
Let the stain sit for a few seconds then lightly wipe the stain with a t-shirt or rag. Apply as many coats of stain as you need to achieve the color you prefer, but wait at least an hour in between coats.
How to Add Padding to the Bench
To add padding to the bench, I used a mattress top and a staple gun. I added the the mattress topper after the bench was completely built, but this might have been easier to do before the top was attached.
Simply flip the bench over, so the top is facing down on top of the mattress top. If you have a lot of excess mattress topper then cut the topper to the correct size, so you have a couple inches of overhang to adhere the topper to the bench.

Once you have your padding cut to size, you can start wrapping the padding around the sides of the bench. Use a staple gun to staple the topper or padding in place.
Adding Fabric to the DIY Wooden Bench
Now that you have a padded bench, you can start adding fabric to the top of the bench. A durable curtain or thick fabric is best to upholster the bench. To attach the fabric, flip the bench with the top facing down just like you did to add padding to the bench.
Then place the bench in the middle of the fabric and pull the fabric over the side of the bench. Pulling the fabric tight, but not too tight so that it doesn’t leave “wrinkles” in the padding.
To adhere the fabric to the bench, use a staple gun and several staples to secure the fabric. Work your way around the bench pulling the fabric tight as your staple the fabric in place.
For the corners, fold the fabric under the bench until it looked nice and smooth on the top then staple in place. Then cut off any excess fabric if needed.
Conclusion
This DIY wooden bench is very durable and can support the weight of 2 adults. The bench can can be used as a table bench, accent bench, or entry way bench. If you need storage then you might like this other wood bench project idea.